In this tutorial we will implement search in Umbraco, without using any plug-in. We will use examine and razor view in this tutorial. First let’s have a short intro to Umbraco and what is Examine.
Short intro to what is Umbraco?
Many Content Management System are used in the world today like (WordPress, Joomla, Prestashop Durapal etc.). One CMS that is not commonly well known is Umbraco.
Umbraco is an open source Microsoft .Net Content Management System (CMS) that runs some of the biggest site on the web. It has the flexibility to run from a small website like (small campaign or brochure sites) to full complex web application.
Umbraco has a very friendly CMS system but the best thing about Umbraco is that you can create any complex application using Asp.net (web forms or MVC).
Examine
Examine basically used lucene.net as its search engine. Examine using lucene.net provides very powerful and fast searching and it is also very simple to use.
We can perform quick search on very large data using lucene.net, Examine uses the lucene.net search/index engine and allows us to index and perform search easily.
This tutorial will show how to use examine to implement search.
Configuration of examine
For the configuration of examine we require these to config files.
/Config/ExamineIndex.config
/Config/ExamineSettings.config
ExamineIndex.config
Here we will create a new index set which contains the information of doctypes we want to index.

Place this indexset just below the other
SetName is the reference, or the alias if you like that we want to remember when were gonna call the index from our providers.
IndexAttributeFields defines all the default Umbraco fields that a node contains such as name, nodetype and more.
IndexUserFields is the alias of the custom fields you have added to your doctypes.
IncludeNodeTypes is the alias of the doctypes you want to search through.
Examine Settings.config
Here we want to do 2 things, adding index and search provider. This index our data and give us the search option.
- Index Provider

Paste it before
</providers>
</ExamineIndexProviders>
- Search Provider

Paste it before
</providers>
</ExamineSearchProviders>
Now go to Umbraco admin panel and in setting go to document types and create a new document type search. Now create a new tab “content” and add the following two generic properties using content tab.

Now do to the home document type or the main document type of your web and go to the structure tab and click the check box with search document type in “Allowed Child type nodes”.
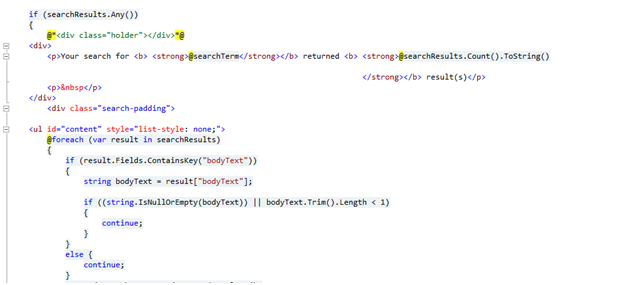
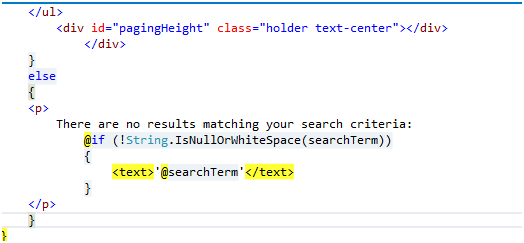
Now we will create a new PartialViewMacrofiles (Search.cshtml) and paste the following code.


Using this macro partials we will create a macro, go to developer section in macro create a new macro Search

Now we create a search template. Go to setting in Umbraco Admin panel and in Templates under master layout create a new template, according to your design add the following two lines.
<h1>@CurrentPage.PageTittle</h1>
<p>@CurrentPage.BodyText</p>
Now go to the content section, create a new page as name as search and in the boddytext call the macro.

Now the last step is to create a search box on your page, add the following code in master lay out

I have used a image as a click search button, you can create it your own way. Now to perform search on inner pages add the following java script code.

And finally here are the search results.


