
Jira is like the Swiss Army knife of project management tools—powerful, versatile, and capable of making your workflow a whole lot smoother… if you know how to use it.
But there’s a flip side: mismanaging user permissions and roles in Jira can lead to chaos faster than you can say, “Why can’t I see that issue anymore?”
Whether you’re a Jira admin, a team lead, or just the unofficial “techy one” who got lumbered with setting it all up, this guide will walk you through exactly how to set permissions and roles without breaking your workflow (or your team’s spirit).
Let’s dive in.
Why Permissions and Roles Matter in Jira
In Jira, permissions are the gatekeepers of what people can and can’t do. They determine who can view, create, edit, transition, or delete issues. Roles, on the other hand, are like job titles in the Jira universe—they define a set of responsibilities that can be assigned to specific users.
Get them right, and your team has just the right level of access to get their work done without roadblocks. Get them wrong, and you’re looking at bottlenecks, missed deadlines, and possibly an awkward “who deleted that sprint?” conversation.
The Two Key Components: Permissions vs. Roles
Think of it this way:
- Roles = “Who you are” in the project (Developer, Tester, Project Manager, Stakeholder, etc.)
- Permissions = “What you can do” based on your role (edit tasks, transition issues, manage sprints, etc.)
These work together to create a structured hierarchy of access that protects your workflow from accidental (or intentional) disruption.
Step 1: Understand Jira’s Permission Levels
Before you start changing anything, you need to know the three main levels where permissions come into play:
Global Permissions – Apply to the entire Jira instance. For example, “Jira Administrators” or “Browse Users.”
Project Permissions – Apply to specific projects and are controlled by the permission scheme assigned to that project.
Issue Security Levels – Control visibility of individual issues within a project.
Pro Tip: Most permission mistakes happen because people don’t realise there’s a difference between global and project permissions.
Step 2: Know Your Default Roles
Jira comes with a few built-in roles, such as:
- Administrators – Full project-level control
- Developers – Can work on issues but with limited admin access
- Users – General access for issue tracking and updates
- Viewers – Can see issues but not make changes
These roles are just a starting point—you can customize them to fit your team’s structure.
Step 3: Map Roles to Real-World Responsibilities
If you’ve ever had someone accidentally close a sprint because they “were just clicking around,” you’ll understand the importance of role mapping.
Here’s a simple example of mapping:
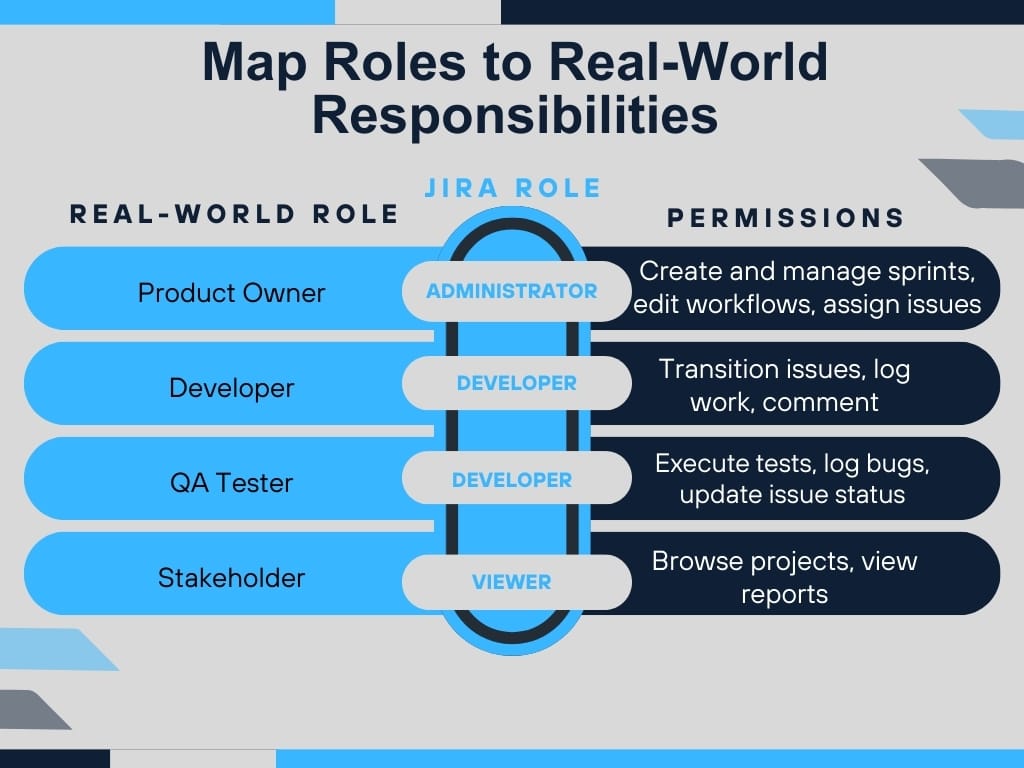
This mapping ensures everyone has enough access to do their job, without the temptation to explore buttons they shouldn’t be pressing.
Step 4: Work with Permission Schemes
A permission scheme is like a blueprint for project permissions. You set up a scheme once, then apply it to multiple projects.
Why this matters:
If you have 10 projects and try to manage permissions individually, you’ll spend more time fixing permissions than actually working on the projects.
Steps to Create/Modify a Permission Scheme:
- Go to Jira Settings > Issues > Permission Schemes.
- Create a new scheme or copy an existing one.
- Assign roles or groups to specific permissions.
- Apply the scheme to one or more projects.
Step 5: Use Groups for Efficiency
While roles work at the project level, groups operate at the global level. Think of them as buckets of users.
Example:
- Group: “Developers” → Contains all dev team members across the company.
- Role: “Developer” → Assigned in specific projects to that group.
By combining roles and groups, you can update access for multiple people in one go, without hunting them down individually.
Step 6: Avoid These Common Permission Pitfalls
Even the most well-meaning Jira admins fall into these traps:
- Giving Everyone Admin Rights – It might seem like a shortcut, but it’s a recipe for disaster.
- Not Reviewing Permissions Regularly – Staff change roles, leave the company, or shift projects—permissions need to change too.
- Too Many Custom Roles – Every extra role you create adds complexity. Keep it simple.
- Overlapping Permissions – Having the same user in multiple roles can cause conflicts.
- Neglecting Issue Security – Sometimes a project needs restricted visibility for sensitive tasks.
Step 7: Test Before Rolling Out
Never roll out a new permission setup without testing it. Create a dummy project, assign roles, and run through typical workflows.
- Can developers move tasks through the board?
- Can testers log bugs without editing unrelated issues?
- Can stakeholders see reports but not change tasks?
Testing prevents those “we can’t work” panics the day after a big change.
Step 8: Document Your Permission Structure
If you don’t document your permission and role setup, future-you (or the next admin) will hate you.
A simple spreadsheet or Confluence page can include:
- The list of roles and their purpose
- Which groups are assigned to which roles
- The permission scheme breakdown
This becomes your “single source of truth” for permissions.
Step 9: Maintain a Review Schedule
Permissions aren’t “set and forget.” Schedule a review—quarterly or bi-annually—to make sure they still make sense.
Ask:
- Has anyone left or joined the team?
- Have responsibilities shifted?
- Do we need to lock down certain permissions?
Regular reviews keep your Jira environment lean and secure.
Step 10: Leverage Audit Logs
If something unexpected happens—like a sprint vanishing or issues being reassigned—Jira’s audit logs are your detective tool.
They show who did what and when, which can help pinpoint if the problem was a permissions issue or just an honest mistake.
The Human Side of Permissions
Remember: permissions aren’t about restricting your team—they’re about empowering them to work without unnecessary risks. Overly restrictive access slows people down, but too much freedom can result in messy boards, deleted sprints, and frustrated team members.
Get feedback from the people actually using Jira day-to-day. If someone feels blocked, adjust accordingly.
Bringing It All Together
Setting up Jira permissions and roles isn’t something to be done haphazardly. It’s a balance of security, efficiency, and flexibility. By:
- Understanding the difference between roles and permissions
- Mapping them to real-world responsibilities
- Using schemes and groups wisely
- Avoiding common pitfalls you’ll keep your workflow running like clockwork.
How CodeDesk Can Help You Manage Jira Like a Pro
If you’re looking to set permissions and roles in Jira but don’t have the time (or patience) to navigate all the menus and schemes, CodeDesk can help. As a seasoned provider of workflow optimisation and project management solutions, CodeDesk specialises in setting up tools like Jira so they work for your team, not against it. Whether it’s creating a scalable permission scheme, managing role assignments, or integrating Jira with other platforms, they’ll make sure your system is both secure and smooth.
Visit CodeDesk to find out how they can transform your Jira setup into a well-oiled machine.
Final Thoughts
Jira permissions and roles might seem intimidating at first, but once you understand the logic behind them, they become one of your most powerful workflow tools. Get them right, and you’ll spend less time firefighting and more time getting things done.
Think of it like setting the rules for a board game—once everyone knows the boundaries, the game flows effortlessly. And the best part? You’ll avoid those “who deleted this?” moments that keep Jira admins awake at night.